
How To Adjust Cabinet Hinges
Welcome to this comprehensive guide on how to adjust cabinet hinges. Cabinet doors play a crucial role in the overall appearance and functionality of your kitchen, bathroom, or any other space with cabinetry. Over time, due to regular use and changes in temperature and humidity, cabinet doors may become misaligned, leading to gaps or unevenness. Learning how to adjust door hinges can save you time and money while maintaining a polished and professional look in your home.
In this guide, we will walk you through the process of adjusting cabinet hinges, covering various types of adjustable hinges cabinet doors, and providing step-by-step instructions for cabinet door hinge adjustment. Whether you are a seasoned professional or a DIY enthusiast, this guide will provide you with valuable insights into the art of adjusting door hinges.
By the end of this guide, you will have the knowledge and confidence needed to adjust cabinet doors in any setting, ensuring that your cabinets remain both visually appealing and fully functional. So let’s dive in and explore the world of adjustable cabinet hinges and cabinet door adjustment techniques.

Cabinet Hinge Types: Identifying Adjustable Hinges Cabinet Doors
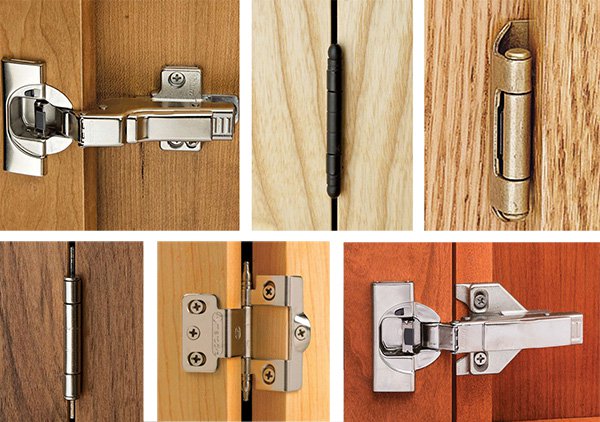
Before diving into the process of how to adjust cabinet hinges, it’s essential to understand the various types of adjustable door hinges that you might encounter. Each hinge type has unique features and adjustments, making it crucial to identify the correct one for successful cabinet door hinge adjustment. In this section, we will explore the most common hinge types and their characteristics to help you effectively adjust cabinet doors.
- European or Concealed Hinges: These hinges are widely popular due to their sleek appearance and adjustability. As the name suggests, they are concealed within the cabinet door and frame, making them invisible when the door is closed. European hinges are designed for easy cabinet door adjustment, offering vertical, horizontal, and depth adjustments.
- Traditional or Surface-Mounted Hinges: Unlike concealed hinges, these hinges are mounted on the surface of the cabinet door and frame, making them visible when the door is closed. While not as versatile as European hinges, some surface-mounted hinges still offer adjustable features for adjusting cabinet hinges.
- Semi-Concealed Hinges: These hinges are a hybrid between concealed and surface-mounted hinges. Part of the hinge is hidden inside the cabinet door and frame, while the other part remains visible. Depending on the specific design, semi-concealed hinges may offer limited adjustments for cabinet door hinge adjustment.
- Pivot Hinges: These hinges are mounted at the top and bottom corners of the cabinet door, allowing it to pivot around a single point. While they provide a clean and minimalistic look, pivot hinges typically have limited adjustability, making them less versatile when it comes to adjusting door hinges.
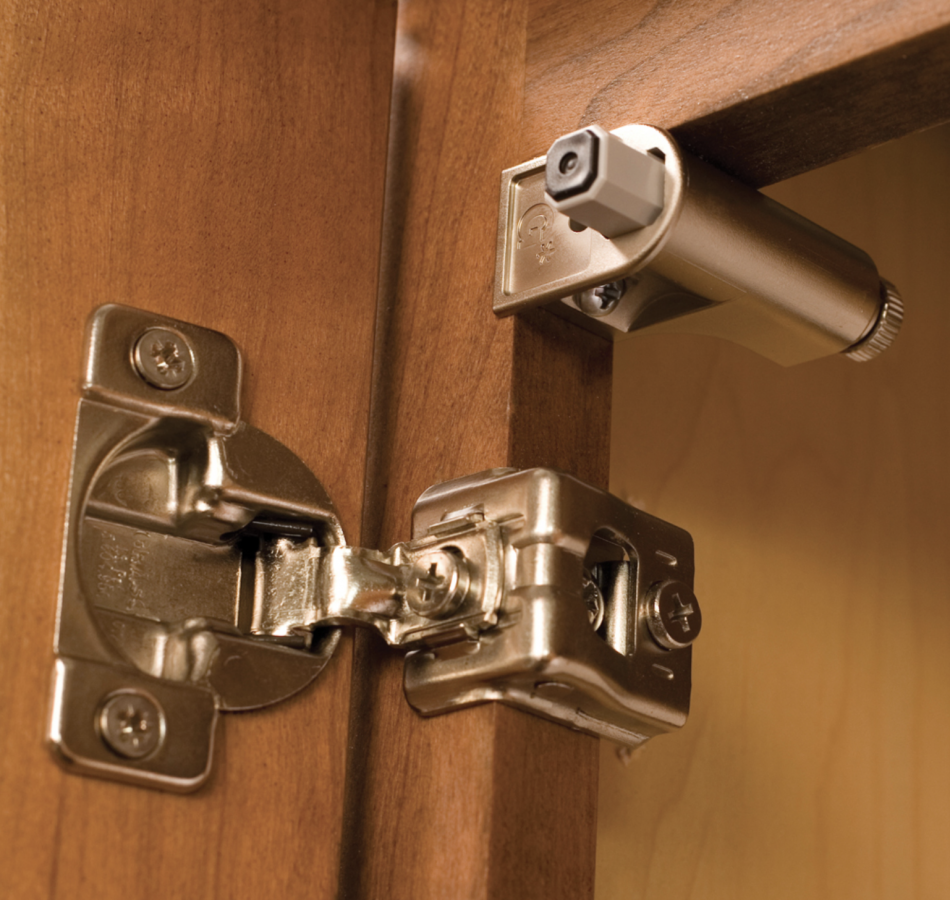
- Soft-Close Hinges: These hinges are designed with a built-in damper that slows down the closing action of the cabinet door, preventing slamming and providing a soft and silent close. Soft-close hinges are available in various styles, including European and traditional designs, and may offer adjustable features for hinge adjustment.
To successfully adjust cabinet doors, it’s essential to identify the type of adjustable hinges cabinet doors used in your cabinetry. Once you’ve determined the hinge type, you can proceed with the appropriate cabinet hinge adjustment techniques, ensuring a professional and well-aligned result.

Basic Tools and Preparations for Adjusting Cabinet Hinges
Before you begin the process of how to adjust door hinges, it’s essential to gather the necessary tools and make proper preparations. This will ensure a smooth and efficient experience when adjusting cabinet hinges, whether you’re working with adjustable cabinet hinges or other hinge types. In this section, we will outline the basic tools and preparations required for cabinet door hinge adjustment.
Tools and Materials:
- Screwdriver: A Phillips or flat-head screwdriver is essential for loosening and tightening screws during the cabinet hinge adjustment process. Some hinges may use a combination of both types, so it’s best to have both handy when adjusting door hinges.
- Tape Measure: A tape measure will help you accurately measure the gaps between cabinet doors and ensure even spacing when you adjust cabinet doors.
- Level: A level will help you check the alignment of your cabinet doors after adjusting cabinet hinges, ensuring a professional and polished appearance.
- Protective Eyewear: Always wear protective eyewear when working with tools to prevent potential eye injuries.
- Cloth or Rag: A soft cloth or rag is useful for wiping away any debris or dust that may have accumulated on the hinges before and after hinge adjustment.
Preparations:
- Clear the Area: Remove any items or obstacles around the cabinet to create a safe and accessible workspace for adjusting cabinet hinges.
- Empty the Cabinet: To prevent any accidents and make it easier to adjust cabinet doors, remove all contents from the cabinet before starting the cabinet door adjustment process.
- Examine the Hinges: Inspect the adjustable cabinet hinges for any visible signs of wear, damage, or loose screws. Tighten any loose screws and replace damaged hinges if necessary.
- Identify Adjustment Screws: Familiarize yourself with the various adjustment screws on your cabinet hinges. Generally, there will be three screws for European hinges: one for vertical adjustments, one for horizontal adjustments, and one for depth adjustments. For other hinge types, the number and location of adjustment screws may vary.
- Clean the Hinges: Use a cloth or rag to wipe away any dust, debris, or accumulated dirt on the hinges before adjusting door hinges. This will ensure smooth operation and prevent damage to the hinges during cabinet door hinge adjustment.
With the proper tools and preparations in place, you’re now ready to adjust cabinet doors using the appropriate techniques for your adjustable hinges cabinet doors. In the following sections, we will guide you through the hinge adjustment process to help you achieve a professional and well-aligned result.
The Three-Way Adjustment Process: Mastering Cabinet Door Hinge Adjustment
When learning how to adjust cabinet hinges, understanding the three-way adjustment process is crucial. This process involves making vertical, horizontal, and depth adjustments to achieve perfectly aligned and functional cabinet doors. In this section, we will explore the three-way adjustment process for adjustable cabinet hinges, providing detailed steps for each adjustment type to help you master cabinet hinge adjustment.
Vertical Adjustments: Aligning Cabinet Doors
Vertical adjustments correct the height of your cabinet doors, ensuring they are level and evenly spaced. To adjust cabinet doors vertically, follow these steps:
a. Locate the vertical adjustment screw on the hinge. For European hinges, this is typically the top screw. b. Loosen the screw slightly, just enough to allow for movement. c. Raise or lower the cabinet door to the desired height by either pushing or pulling the door. d. Tighten the screw to secure the door in place. e. Use a level to check the alignment of the door and make any necessary adjustments. f. Repeat the process on all hinges of the door for a consistent height adjustment.
Horizontal Adjustments: Perfecting the Door Gap
Horizontal adjustments control the gap between adjacent cabinet doors or between the door and the cabinet frame. To adjust cabinet doors horizontally, follow these steps:
a. Locate the horizontal adjustment screw on the hinge. For European hinges, this is usually the middle screw. b. Loosen the screw slightly, allowing the door to shift horizontally. c. Move the cabinet door left or right to achieve the desired gap between doors or between the door and the frame. d. Tighten the screw to secure the door in its new position. e. Use a tape measure to ensure even spacing between adjacent cabinet doors. f. Repeat the process on all hinges of the door to maintain uniform horizontal adjustments.
Depth Adjustments: Ensuring Flush Cabinet Doors
Depth adjustments control the distance between the cabinet door and the cabinet frame, ensuring a flush and seamless appearance. To adjust cabinet doors for depth, follow these steps:
a. Locate the depth adjustment screw on the hinge. For European hinges, this is typically the bottom screw. b. Loosen the screw slightly to enable depth adjustments. c. Push or pull the door to adjust its position relative to the cabinet frame, ensuring the door sits flush with the frame. d. Tighten the screw to hold the door in its adjusted position. e. Check the cabinet door for any gaps or protrusions, making further adjustments as needed. f. Repeat the process on all hinges of the door to achieve consistent depth adjustments.
By mastering the three-way cabinet door hinge adjustment process, you can effectively adjust cabinet doors for a professional and well-aligned appearance. Always remember to check the alignment and gap measurements after each adjustment, making any necessary corrections to ensure your adjustable hinges cabinet doors function correctly and look their best.
Adjusting European-Style Hinges: A Comprehensive Guide
European-style hinges, also known as concealed hinges, are popular for their sleek appearance and excellent adjustability. In this section, we will provide a comprehensive guide on how to adjust door hinges specifically designed for European-style hinges. By following these steps, you can effectively perform cabinet hinge adjustment for adjustable door hinges that use this type of hinge.
- Determine the Desired Adjustments: Before adjusting cabinet hinges, assess the current state of your cabinet doors. Identify any misalignments, uneven gaps, or doors that are not flush with the cabinet frame. This will help you determine the necessary adjustments for each cabinet door.
- Understand the Adjustment Screws: European hinges have three adjustment screws, each responsible for a specific type of adjustment:a. Vertical Adjustment Screw: Typically located at the top of the hinge, this screw controls the door’s height. b. Horizontal Adjustment Screw: Usually found in the middle of the hinge, this screw adjusts the gap between the cabinet door and adjacent doors or the frame. c. Depth Adjustment Screw: Commonly located at the bottom of the hinge, this screw affects the door’s depth, ensuring it sits flush with the cabinet frame.
- Adjust Cabinet Doors: Follow the three-way adjustment process outlined in the previous section, “Mastering Cabinet Door Hinge Adjustment,” to make the necessary vertical, horizontal, and depth adjustments for your European-style hinges. Be sure to check the alignment and gap measurements after each adjustment to ensure your cabinet doors are properly aligned.
- Test the Door’s Functionality: After adjusting cabinet hinges, open and close the door to ensure it operates smoothly without any obstructions or rubbing. Make any necessary additional adjustments to fine-tune the door’s alignment.
- Double-Check Your Work: Inspect the entire cabinet to ensure all doors are consistently aligned, have even gaps, and sit flush with the cabinet frame. Make any final tweaks if necessary to achieve a polished and professional appearance.
By following this comprehensive guide for adjusting European-style hinges, you can effectively adjust cabinet doors in any setting. Remember to take your time and make incremental adjustments, checking the alignment and gaps after each step to ensure a well-aligned and fully functional adjustable hinges cabinet doors.
Troubleshooting Common Issues: Expert Tips for Adjust Cabinet Doors
Adjusting cabinet hinges can sometimes present challenges or reveal underlying issues that may impact the success of your cabinet door hinge adjustment. In this section, we will explore common issues you may encounter while adjusting door hinges and provide expert tips for addressing these problems to ensure your adjustable hinges cabinet doors remain in top shape.
- Uneven Gaps Between Cabinet Doors
Issue: Despite adjusting door hinges, you still notice uneven gaps between cabinet doors or between the door and the frame.
Solution: Double-check the horizontal adjustments and ensure all hinges on the affected doors have been adjusted consistently. If the problem persists, inspect the cabinet doors and frames for warping or damage, which may require replacement or repair.
- Cabinet Door Not Closing Properly
Issue: After adjusting cabinet hinges, the door doesn’t close properly or appears to be misaligned.
Solution: Revisit the three-way adjustment process and ensure all three types of adjustments (vertical, horizontal, and depth) have been correctly executed. If necessary, loosen the screws and make small incremental adjustments until the door closes smoothly.
- Door Rubbing Against Another Door or Cabinet Frame
Issue: The cabinet door rubs against an adjacent door or the cabinet frame when opened or closed.
Solution: Adjust the horizontal and depth adjustments on the affected hinges to create adequate clearance between the doors and the frame. If the issue persists, check for warping or damage to the doors or frames, which may require repair or replacement.
- Loose or Worn Hinges
Issue: The cabinet door hinge is loose or worn, causing the door to sag or become misaligned.
Solution: Tighten any loose screws on the hinge and inspect the hinge for signs of wear or damage. If the hinge is damaged, replace it with a new, compatible adjustable hinge for cabinet doors.
- Difficulty Adjusting Screws
Issue: The adjustment screws on the hinges are difficult to turn or appear to be stuck.
Solution: Use a cloth or rag to clean any debris or accumulated dirt around the screws. If necessary, apply a small amount of lubricant to the screw threads and try adjusting again. If the screw remains stuck, consider replacing the hinge.
By addressing these common issues, you can ensure a successful and professional-looking cabinet door hinge adjustment. Remember that patience and attention to detail are key when learning how to adjust cabinet hinges, and do not hesitate to consult a professional if you encounter persistent problems or require assistance with your adjustable door hinges.
Proper Maintenance: Keeping Your Adjustable Hinges Cabinet Doors in Top Shape
Once you have successfully adjusted your cabinet hinges, it’s essential to maintain your adjustable cabinet hinges to ensure their longevity and continued functionality. In this section, we will provide tips and guidelines for proper maintenance, helping you keep your cabinet hinge adjustment in top shape for years to come.
- Regular Inspections: Periodically inspect your cabinet hinges for signs of wear, damage, or loose screws. Address any issues promptly to prevent further damage and maintain the alignment of your cabinet doors.
- Cleaning and Lubrication: Keep your adjustable door hinges clean and free of debris by wiping them down with a soft cloth or rag as needed. Apply a small amount of lubricant to the hinge mechanisms every 6 to 12 months to ensure smooth operation and prevent corrosion.
- Avoid Overloading Cabinets: Overloading your cabinets with heavy items can strain the hinges and cause them to wear out prematurely. Distribute weight evenly among your cabinets and avoid placing excessive weight on individual doors.
- Addressing Warping and Damage: If you notice warping or damage to your cabinet doors or frames, address the issue as soon as possible. This may involve repairing or replacing the affected components to ensure proper alignment and functionality of your adjustable hinges cabinet doors.
- Periodic Adjustments: Over time, your cabinet doors may shift due to natural settling or changes in temperature and humidity. Periodically check the alignment of your cabinet doors and perform any necessary cabinet door hinge adjustments to keep them looking their best.
- Seek Professional Help: If you encounter persistent issues with your hinge adjustment or are unsure how to adjust cabinet hinges, consult a professional. They can provide guidance and assistance to ensure the longevity and functionality of your adjustable door hinges.
By following these proper maintenance guidelines, you can keep your adjustable cabinet hinges in top shape, ensuring a well-aligned and functional cabinetry system for years to come. Regular care and attention to your cabinet hinges will not only enhance the appearance of your cabinetry but also extend the life of your hinges and doors.
Conclusion: Enjoying Your Perfectly Adjusted Cabinet Hinges
Learning how to adjust cabinet hinges is a valuable skill that can enhance the appearance and functionality of your cabinetry. By mastering the cabinet door hinge adjustment process, you can achieve well-aligned and properly functioning adjustable hinges cabinet doors, giving your kitchen or bathroom a polished and professional look.
In this guide, we have covered various aspects of adjusting cabinet hinges, including identifying hinge types, preparing your tools and workspace, mastering the three-way adjustment process, and troubleshooting common issues. We have also provided guidance on the proper maintenance of your adjustable cabinet hinges to ensure their longevity and continued functionality.
By following the expert tips and detailed instructions provided in this guide, you can effectively adjust cabinet doors to achieve a well-aligned and visually appealing cabinetry system. Moreover, regular maintenance and attention to your cabinet hinges will help extend their lifespan and maintain their functionality for years to come.
Now that you have the knowledge and skills to adjust your cabinet hinges, you can enjoy the satisfaction of a perfectly aligned and functional cabinetry system. Whether you’re tackling a DIY project or simply maintaining your existing cabinets, your newly acquired expertise in cabinet hinge adjustment will serve you well, ensuring a beautiful and functional space for you and your family to enjoy.


