How to Build a DIY Hanging Pot Rack
A hanging pot rack is an efficient and stylish way to store your pots and pans, freeing up precious cabinet and counter space in your kitchen. Not only does it keep your cookware within easy reach, but it also adds an element of visual appeal. A DIY hanging pot rack can be a budget-friendly and customizable solution to suit your kitchen’s unique style and storage needs. In this blog post, we will outline the steps to create your own hanging pot rack, covering everything from choosing the right materials to putting the finishing touches on your masterpiece.
Materials and Tools Needed
To create a DIY hanging pot rack that is both functional and visually appealing, you’ll need the right materials and tools. Here’s a list of what you’ll need to get started:
- Lumber or metal bars (for the frame): Choose a material that complements your kitchen’s style and can support the weight of your pots and pans. Lumber is a popular choice for a rustic or farmhouse look, while metal bars can provide a sleek, modern appearance.
- S-hooks or pot hooks: These will hold your pots, pans, and other kitchen utensils. Ensure they are sturdy and can support the weight of your cookware.
- Ceiling hooks or brackets: These will secure your pot rack to the ceiling. Make sure they are strong enough to bear the weight of the frame and cookware.
- Chain or cable (for hanging): Choose a durable material that can support the weight of your pot rack and cookware. Aesthetic considerations are also important, so pick a chain or cable that matches your overall design.
- Tape measure: For taking accurate measurements of your space and materials.
- Drill and drill bits: For drilling pilot holes and attaching hardware.
- Level: To ensure your pot rack is hung evenly and securely.
- Saw (if using lumber): For cutting the lumber to the desired dimensions.
- Metal cutting tools (if using metal bars): For cutting the metal bars to the appropriate size.
- Sandpaper (if using lumber): To smooth the lumber’s edges and surfaces.
- Paint or stain (optional): To add a finishing touch to your pot rack and match your kitchen’s decor.
- Safety goggles and gloves: To protect your eyes and hands while working with tools and materials.
Gathering the right materials and tools is crucial for a successful DIY hanging pot rack project. Be sure to double-check your inventory before beginning, so you don’t have to pause in the middle of the process to find or purchase additional items.
Choose and Prepare Your Frame Material
Selecting the appropriate material for your pot rack frame is essential for both its functionality and aesthetic appeal. In this section, we will provide detailed guidance on choosing and preparing the frame material for your DIY hanging pot rack.
A. Selecting Frame Material
- Lumber: If you prefer a rustic or farmhouse look, lumber is an excellent choice. Hardwoods such as oak, maple, or walnut are strong and durable, making them ideal for supporting the weight of your cookware. Keep in mind that lumber can be heavy, so ensure your ceiling can handle the additional weight.
- Metal Bars: For a modern or industrial look, metal bars are a great option. They are lightweight and strong, making them suitable for hanging pot racks. Choose from materials such as steel, aluminum, or brass, depending on your preferred style and budget.
B. Cutting and Measuring
- Measure the desired dimensions for your pot rack frame, considering the available space in your kitchen and the number of pots and pans you plan to store. Ensure there is enough clearance around the pot rack for safe and easy access to your cookware.
- Using a saw (for lumber) or metal cutting tools (for metal bars), carefully cut your frame material to the required dimensions. Wear safety goggles and gloves while cutting to protect yourself from potential injuries.
C. Sanding and Finishing (For Lumber)
- Smooth any rough edges or surfaces with sandpaper, starting with a lower grit (80-100) and gradually moving to a higher grit (150-220) for a smooth finish.
- Wipe down the lumber with a tack cloth to remove any dust or debris.
- Apply a coat of wood conditioner to promote even absorption of stain or paint, following the manufacturer’s instructions.
- Apply your chosen stain or paint to the lumber, using a brush or rag for even coverage. Allow the first coat to dry, then assess if additional coats are needed for your desired finish. Let the stain or paint dry completely before moving on to the next steps.
D. Preparing Metal Bars (For Metal Frames)
- Wipe down the metal bars with a cloth and rubbing alcohol to remove any grease or dirt.
- If desired, apply a coat of metal primer, following the manufacturer’s instructions. This will help the paint adhere better to the metal surface.
- Apply a coat of metal paint, using a brush or spray paint, depending on your preference. Allow the paint to dry, then add additional coats if necessary for your desired finish. Let the paint dry completely before proceeding with the pot rack assembly.
By carefully selecting and preparing your frame material, you can create a sturdy, professional-looking DIY hanging pot rack that matches your kitchen’s style and meets your storage needs.
Design Your Hanging Pot Rack
Designing your hanging pot rack involves considering the available space, the number of pots and pans you plan to store, and your personal aesthetic preferences. In this section, we will provide a detailed guide to help you design the perfect DIY hanging pot rack for your kitchen.
A. Assess Your Space and Cookware Collection
- Measure the available space in your kitchen where you want to hang the pot rack. Consider the height, width, and depth, as well as any obstacles, such as lighting fixtures or ventilation hoods.
- Count the number of pots, pans, and other kitchen utensils you want to store on your hanging pot rack. This will help you determine the size and layout of your design.
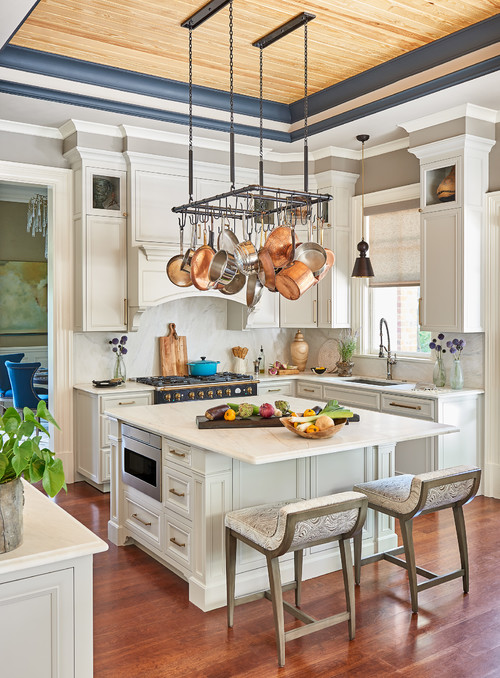
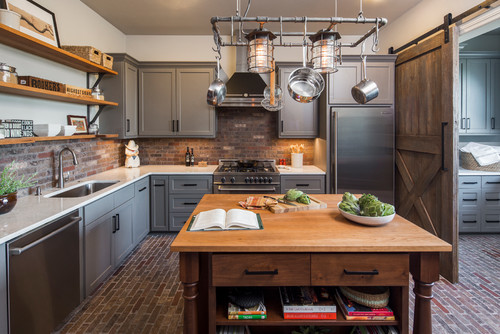
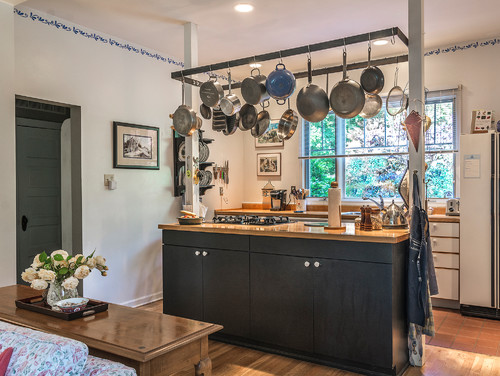
B. Choose Your Pot Rack Shape and Style
- Rectangular or square pot racks are popular choices because they provide ample storage space and can be easily customized. This shape is ideal for larger kitchens or spaces with higher ceilings.
- Round or oval pot racks are ideal for smaller kitchens or spaces with limited storage options. They can also provide a unique design element and work well in kitchens with curved or circular features.
- Ladder-style pot racks are simple and versatile, making them suitable for various kitchen styles. This design consists of two parallel bars connected by evenly spaced crossbars, offering ample space for hooks and hanging cookware.
C. Plan the Layout
- Sketch your pot rack design on paper or use a digital design tool to create a visual representation. This will help you determine the placement of hooks and other elements.
- Space the hooks evenly along the frame, ensuring there is enough room for each pot and pan to hang without touching each other or the walls. This will prevent damage to your cookware and make it easier to access when needed.
- Consider adding additional storage solutions, such as a shelf for lids or a magnetic strip for knives, to maximize the functionality of your hanging pot rack.
D. Finalize Your Design
- Review your design sketch or digital representation, ensuring it meets your storage needs, fits within the available space, and complements your kitchen’s style.
- Make any necessary adjustments to the design before proceeding with the assembly process. This may include changing the dimensions, altering the layout, or incorporating additional storage elements.
By following these detailed steps, you can design a professional and functional DIY hanging pot rack that meets your specific storage needs and enhances your kitchen’s overall aesthetic.

Attach Hooks or Brackets to the Ceiling
In this section, we will provide a detailed guide to properly and securely attach hooks or brackets to your ceiling. This is a crucial step to ensure your DIY hanging pot rack remains stable and safe.
A. Locate Ceiling Joists
- Use a stud finder to locate the ceiling joists, which are the structural supports for your ceiling. Attaching your pot rack to the joists is essential for stability and safety.
- Mark the positions of the joists on the ceiling using a pencil or masking tape. This will help you accurately place your hooks or brackets.
B. Determine Hook or Bracket Placement
- Based on your pot rack design and dimensions, determine the appropriate positions for your ceiling hooks or brackets. Ensure they align with the ceiling joists you identified earlier.
- Mark the exact locations for the hooks or brackets on the ceiling, double-checking that they correspond with the joist positions and the layout of your pot rack frame.
C. Drill Pilot Holes
- Using a drill and the appropriate size drill bit, carefully drill pilot holes into the marked locations on the ceiling. Pilot holes help guide the hooks or brackets and prevent the ceiling material from splitting or cracking.
- Wear safety goggles and gloves during the drilling process to protect your eyes and hands from debris and potential injuries.
D. Install Hooks or Brackets
- Follow the manufacturer’s instructions to install your chosen ceiling hooks or brackets. This may involve screwing them directly into the pilot holes or using additional hardware, such as anchors or toggle bolts.
- Use a level to ensure the hooks or brackets are evenly aligned and level with each other. Proper alignment is crucial for the stability and appearance of your hanging pot rack.
- Ensure the hooks or brackets are securely fastened to the ceiling joists and can support the weight of your pot rack and cookware.
By following these detailed steps, you can confidently and securely attach hooks or brackets to your ceiling, providing a strong foundation for your DIY hanging pot rack.

Assemble the Frame
In this section, we will provide a detailed and professional guide to assembling the frame of your DIY hanging pot rack. Proper assembly is crucial to ensure the stability and durability of your pot rack.
A. Lay Out Frame Components
- Lay out the cut and prepared frame pieces on a flat, clean work surface, positioning them according to your pot rack design.
- Verify that all pieces are the correct dimensions and that the layout matches your design plan.
B. Connect the Frame Pieces
- For wooden frames: a. Use wood glue and clamps to join the corners of the frame, ensuring they are square and aligned. b. Reinforce the joints with screws or corner brackets, drilling pilot holes to prevent splitting the wood. c. Allow the wood glue to dry according to the manufacturer’s instructions before removing the clamps and proceeding with the next steps.
- For metal frames: a. Align the metal bars and use a combination of metal brackets and screws, welding, or metal adhesive to join the corners, ensuring they are square and aligned. b. Follow the manufacturer’s instructions for using metal adhesive or welding equipment, and wear appropriate safety gear such as goggles and gloves.
C. Add Crossbars or Supports (If Applicable)
- Measure and mark the positions for the crossbars or supports on the frame, ensuring they are evenly spaced and aligned.
- Attach the crossbars or supports to the frame using appropriate hardware or joinery techniques. For wooden frames, use wood glue, screws, or dowels. For metal frames, use metal brackets and screws, welding, or metal adhesive.
- Verify that the crossbars or supports are level and securely fastened to the frame.
D. Inspect the Frame
- Check the assembled frame for any gaps, misalignments, or loose connections, and make any necessary adjustments.
- Ensure the frame is sturdy, square, and properly assembled before proceeding with the next steps.
By following these detailed and professional steps, you can assemble a strong and stable frame for your DIY hanging pot rack, providing a solid foundation for storing your pots, pans, and other kitchen utensils.
Attach and Adjust Hanging Hardware
In this section, we will provide a detailed and professional guide to attaching and adjusting the hanging hardware for your DIY pot rack. Proper installation of the hanging hardware is essential for ensuring the stability and safety of your pot rack.
A. Attach the Chain or Cable to the Frame
- Measure and cut the chain or cable to the desired length, considering the height of your ceiling and the desired distance between the pot rack and the ceiling. Ensure that all pieces are of equal length for a level installation.
- Attach one end of each chain or cable to the corners of your pot rack frame using S-hooks or other appropriate connectors. Make sure the connections are secure and the chain or cable is taut.
B. Connect the Chain or Cable to the Ceiling Hooks or Brackets
- Carefully lift the pot rack frame and hook the other end of each chain or cable to the installed ceiling hooks or brackets.
- Check that the pot rack hangs level and at the desired height. If adjustments are needed, carefully unhook the chains or cables and shorten or lengthen them accordingly.
- Verify that all connections are secure and the pot rack hangs steadily from the ceiling hooks or brackets.
C. Install Pot Hooks on the Frame
- Position the S-hooks or pot hooks along the pot rack frame according to your design plan, ensuring they are evenly spaced and securely fastened.
- Test the strength and security of each hook by gently pulling on it. Make any necessary adjustments to ensure the hooks can support the weight of your pots and pans.
D. Hang Your Cookware
- Carefully hang your pots, pans, and other kitchen utensils on the pot hooks, distributing the weight evenly across the pot rack.
- Ensure that each pot and pan is securely hung and can be easily accessed when needed.
By following these detailed and professional steps, you can securely attach and adjust the hanging hardware for your DIY pot rack, providing a stable and accessible storage solution for your pots, pans, and other kitchen utensils.
Maintenance and Safety Tips
To ensure the longevity and safety of your DIY hanging pot rack, it’s essential to follow proper maintenance practices and adhere to safety guidelines. In this section, we provide a detailed and professional guide to maintaining your pot rack and keeping your kitchen environment safe.
A. Regularly Inspect the Pot Rack
- Periodically examine the pot rack’s components, including the frame, hooks, chains or cables, and ceiling attachments, for signs of wear, damage, or loosening.
- Check the connections between the chains or cables and the frame, as well as the ceiling hooks or brackets, to ensure they remain secure and can support the weight of your cookware.
- Inspect the pot hooks for signs of wear or damage, and replace any that appear compromised.
B. Clean the Pot Rack
- Regularly dust the pot rack frame and hooks to prevent the buildup of dirt and debris.
- For a more thorough cleaning, use a mild cleaner and a damp cloth to wipe down the frame and hooks. Avoid using harsh chemicals or abrasive materials, as these can damage the pot rack’s finish.
- Dry the pot rack thoroughly after cleaning to prevent moisture damage or corrosion, especially for metal components.
C. Maintain Your Cookware
- Ensure that your pots, pans, and other kitchen utensils are clean and dry before hanging them on the pot rack to prevent the spread of bacteria and the buildup of moisture.
- Periodically inspect your cookware for signs of wear or damage, and replace any items that are no longer safe for use.
D. Safety Precautions
- Always ensure that the pot rack is securely fastened to the ceiling joists and can support the weight of your cookware.
- Do not overload the pot rack, as this can compromise its stability and increase the risk of accidents.
- Hang cookware in a way that allows for easy access without the need for excessive reaching or stretching, which can lead to accidents or injuries.
- Keep the area around the pot rack clear of obstructions, such as lighting fixtures or ventilation hoods, to prevent accidents while accessing your cookware.
By following these detailed and professional maintenance and safety tips, you can keep your DIY hanging pot rack in excellent condition and ensure a safe and efficient kitchen environment for years to come.
Troubleshooting Common Issues
Despite careful planning and execution, you may encounter some issues while using your DIY hanging pot rack. In this section, we provide a detailed and professional guide to troubleshooting common problems and finding effective solutions.
A. Uneven Hanging or Sagging
- Check the lengths of the chains or cables to ensure they are equal. If they are not, adjust the lengths accordingly to level the pot rack.
- Inspect the ceiling hooks or brackets to verify they are level and securely fastened to the ceiling joists.
- Ensure the weight of your cookware is evenly distributed across the pot rack. Rearrange your pots and pans if necessary to balance the load.
B. Excessive Noise or Movement
- Inspect the pot rack frame and connections to ensure all components are securely fastened and tightened.
- Check the connections between the chains or cables and the frame, as well as the ceiling hooks or brackets, to make sure they are secure and stable.
- Consider using rubber washers or other dampening materials between the frame and hanging hardware to reduce noise and movement.
C. Difficulty Accessing Cookware
- Evaluate the height of your pot rack and adjust the chain or cable lengths if necessary to ensure your cookware is easily reachable.
- Reorganize your pots, pans, and other kitchen utensils on the pot rack to improve accessibility and visibility.
- Consider adding a step stool or ladder to your kitchen to safely access cookware on higher levels of the pot rack.
D. Damage to Cookware
- Ensure that your pots, pans, and other kitchen utensils are hung securely and do not touch each other or nearby walls to prevent scratching or denting.
- Inspect the pot hooks for any sharp edges or rough surfaces that could damage your cookware and replace them if necessary.
- Consider using additional protective measures, such as rubberized or padded hooks, to minimize the risk of damage to your cookware.
By following these detailed and professional troubleshooting tips, you can identify and resolve common issues with your DIY hanging pot rack, ensuring a functional and efficient kitchen storage solution.
Customizing and Enhancing Your Pot Rack
Your DIY hanging pot rack can be further customized and enhanced to better suit your needs and personal style. In this section, we provide a detailed and professional guide to adding features and personal touches to your pot rack.
A. Incorporate Additional Storage Solutions
- Add a shelf above or below the pot rack frame to store lids, cookbooks, or other kitchen essentials.
- Attach a magnetic strip to the frame or nearby wall to store knives or other metal utensils within easy reach.
- Incorporate hooks or baskets on the sides or bottom of the pot rack to store smaller items, such as whisks, spatulas, or measuring cups.
B. Enhance the Pot Rack’s Aesthetic
- Paint or stain the pot rack frame to match or complement your kitchen’s color scheme and style.
- Consider using decorative hooks, chains, or cables to add visual interest and coordinate with your kitchen’s design.
- Add decorative elements, such as ornamental brackets or finials, to give your pot rack a more polished and personalized appearance.
C. Improve Lighting and Visibility
- Install LED strip lights or puck lights on the pot rack frame or nearby surfaces to illuminate your cookware and workspace.
- Choose light fixtures that complement the style of your pot rack and kitchen for a cohesive look.
- Ensure the lighting is installed safely, following manufacturer guidelines and local electrical codes.
D. Upgrade or Modify the Pot Rack Design
- If your storage needs or kitchen layout change, consider modifying your pot rack design to better suit your requirements.
- Upgrade your pot rack by adding more hooks, crossbars, or storage options as needed.
- If you decide to move or renovate your kitchen, you can disassemble and reassemble the pot rack in a new location, adjusting the design as necessary to fit the new space.
By following these detailed and professional customization tips, you can enhance and personalize your DIY hanging pot rack, creating a functional and visually appealing storage solution tailored to your specific needs and style preferences.
Conclusion
Congratulations on successfully building your DIY hanging pot rack! With proper planning, preparation, and execution, you have created a functional and stylish storage solution for your kitchen cookware. We hope this guide has been helpful in guiding you through the process of designing and building your pot rack, and that the maintenance and safety tips will ensure its longevity and safety.
Remember to regularly inspect and maintain your pot rack, following the troubleshooting tips as needed to address any issues that may arise. Consider customizing and enhancing your pot rack to better suit your storage needs and personal style.
FAQs
Q: What materials are best for building a hanging pot rack?
A: The best materials for a hanging pot rack depend on personal preference and the design of the pot rack. Common materials include wood, metal, and wrought iron. Metal and wrought iron offer durability and strength, while wood offers a natural and rustic look.
Q: How do I know if my pot rack can support the weight of my cookware?
A: It’s important to ensure that your pot rack is securely attached to the ceiling joists and that the hanging hardware can support the weight of your cookware. You can consult the manufacturer’s specifications or consult with a professional to ensure that your pot rack is properly designed and installed to support the desired weight.
Q: Can I install a hanging pot rack in a rental apartment or home?
A: This will depend on the terms of your rental agreement and the type of pot rack you plan to install. It’s important to consult with your landlord or property manager and follow any guidelines or restrictions regarding alterations or installations.
Q: Can I modify the design of my pot rack after it’s been built?
A: Yes, you can modify the design of your pot rack as needed to better suit your storage needs or personal style. You can add or remove hooks, crossbars, or other storage options, or repaint or refinish the frame to update its appearance.
Q: How can I ensure the safety of my pot rack and kitchen environment?
A: It’s important to ensure that your pot rack is securely attached to the ceiling joists and that the hanging hardware can support the weight of your cookware. Avoid overloading the pot rack and ensure that the weight of your cookware is evenly distributed. Keep the area around the pot rack clear of obstructions and use a step stool or ladder to safely access higher levels. Regularly inspect and maintain the pot rack and its components, and follow proper cleaning practices to prevent the buildup of dirt and debris.
Q: Can I use a hanging pot rack for other purposes besides storing cookware?
A: Yes, you can customize your pot rack to store a variety of kitchen and household items, such as utensils, books, or even plants. With additional shelves, baskets, or hooks, your pot rack can serve as a versatile storage solution for many different items.
Q: Do I need to hire a professional to install a hanging pot rack?
A: While hiring a professional can ensure a safe and proper installation, it’s possible to install a hanging pot rack yourself with proper planning and execution. It’s important to follow the manufacturer’s instructions and local building codes to ensure a safe and stable installation.
Q: How often should I clean and maintain my pot rack?
A: It’s recommended to regularly dust the pot rack frame and hooks to prevent the buildup of dirt and debris, and to thoroughly clean the pot rack as needed. This can depend on usage and the environment in which the pot rack is installed. It’s important to inspect the pot rack and its components regularly for signs of wear or damage and to address any issues promptly.
Q: Can I use a hanging pot rack in a small kitchen?
A: Yes, a hanging pot rack can be a great storage solution for a small kitchen, as it allows you to store cookware and utensils in a space-efficient and accessible way. It’s important to consider the size and design of your pot rack and to ensure that it’s safely and securely attached to the ceiling.
Q: Can I use a hanging pot rack in a kitchen with low ceilings?
A: Yes, a hanging pot rack can still be used in a kitchen with low ceilings. It’s important to measure the height of your ceiling and adjust the length of the chains or cables accordingly to ensure that your pot rack hangs at a safe and accessible level.