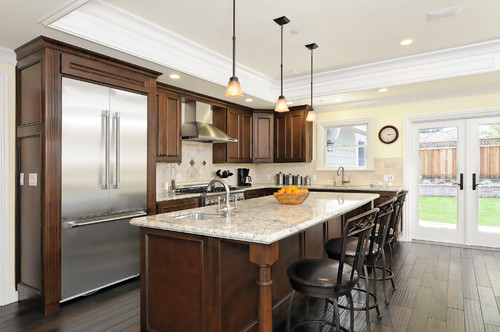
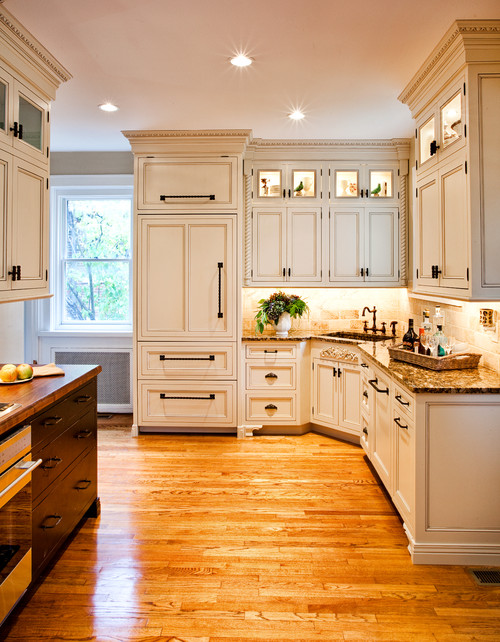
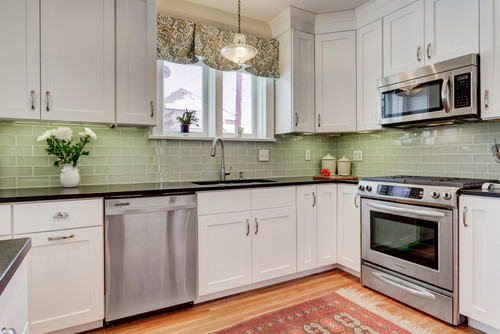
How to Install Crown Molding on Cabinets
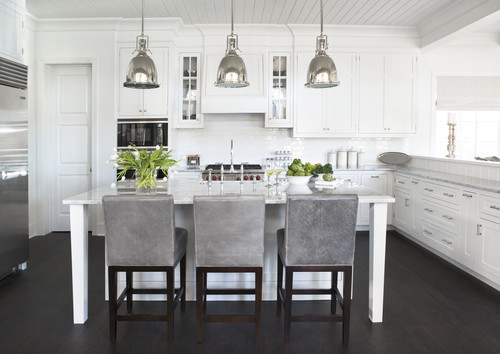
Enhance the beauty and elegance of your kitchen with crown molding on cabinets. Not only does this addition create a more sophisticated look, but it can also increase the value of your home. In this detailed and professional guide, we’ll walk you through the process of installing crown molding on your cabinets. We’ll cover everything from selecting the right kitchen crown molding to measuring, cutting, and attaching the molding. By following these steps, you can transform your kitchen moldings and give your space a refined finish.
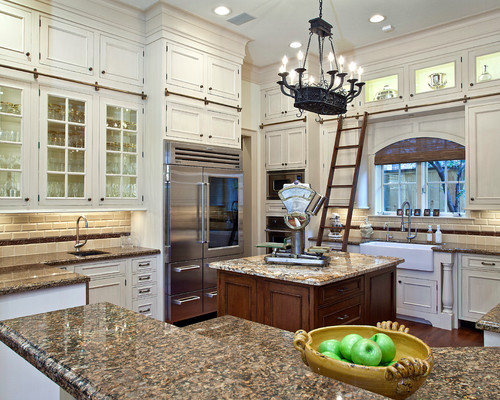
Selecting the Right Kitchen Crown Molding
Choosing the perfect crown molding for your cabinets is a crucial step in achieving a polished and professional look. By considering factors such as material, style, and size, you can select the ideal kitchen crown molding to enhance your space. In this section, we’ll guide you through the process of selecting the right crown molding for your cabinets, ensuring a seamless and attractive result.
Material Options
There are various materials to choose from when selecting crown molding for your cabinets. Each material has its advantages and disadvantages, so consider your kitchen’s style, budget, and maintenance requirements when making your decision:
- Solid Wood: This classic option provides a warm and natural appearance, making it a popular choice for traditional kitchens. While it can be more expensive and susceptible to moisture damage, solid wood molding is durable and can be stained or painted to match your existing cabinet molding.
- Medium-Density Fiberboard (MDF): MDF is an affordable and versatile alternative to solid wood. This engineered material is less prone to warping and can be painted to match your cabinets. However, it may not be as durable as solid wood and is less suitable for staining.
- Polyurethane: This synthetic material is lightweight, moisture-resistant, and easy to install. It’s a popular choice for those seeking a low-maintenance option that mimics the look of traditional wood moldings. Polyurethane can be painted to match your kitchen moldings and is often more budget-friendly than solid wood.
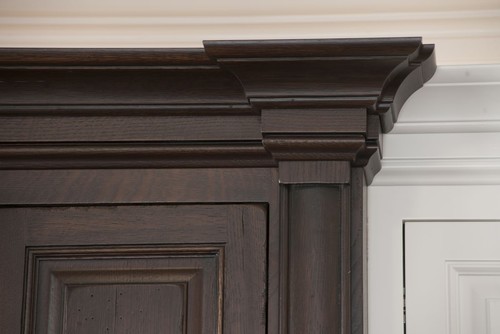
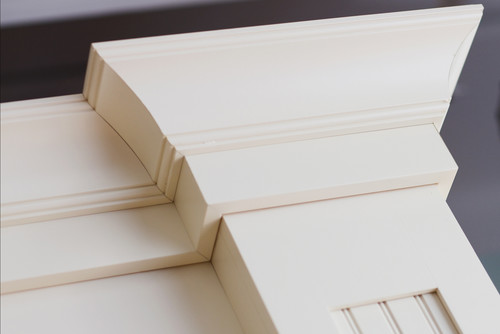
Crown Molding Styles
Crown molding comes in various styles, ranging from simple and modern to ornate and traditional. Consider your kitchen’s overall design and your personal preferences when selecting a style:
- Simple and Streamlined: For a contemporary kitchen, choose a molding with clean lines and minimal details. This style will complement modern cabinetry and create a cohesive look.
- Ornate and Traditional: If your kitchen has a classic or vintage design, opt for a more decorative crown molding. Features such as dentil molding, egg-and-dart patterns, or intricate carvings can add an elegant touch to your cabinet crown molding.
- Transitional: For a versatile option that blends traditional and contemporary elements, consider a transitional molding style. This option can work well in a variety of kitchen designs, providing a timeless and adaptable look.
Sizing Your Kitchen Crown Molding
The size of the crown molding you choose should be proportionate to the height and scale of your cabinets. For example:
- For standard 8-foot ceilings, choose a molding that’s 2-4 inches in height.
- For taller ceilings (9-10 feet), opt for a molding that’s 4-6 inches in height.
- For ceilings taller than 10 feet, select a molding that’s 6-8 inches or larger.
Remember to account for any additional decorative elements, such as corbels or onlays, when selecting the size of your molding.
By carefully considering your material, style, and size preferences, you can select the perfect kitchen crown molding to enhance your cabinets and create a stunning, professional appearance.
Measuring and Preparing the Cabinets
Before installing crown molding on cabinets, it’s essential to take accurate measurements and prepare the surface of your cabinets. This process will ensure a seamless fit and a professional appearance. In this section, we’ll provide a detailed guide to measuring and preparing your cabinets for the installation of kitchen crown molding.
Measuring the Cabinets
To determine the amount of crown molding required, follow these steps:
- Measure the perimeter of your cabinets where the molding will be installed. Use a measuring tape to measure the length of each section and add these measurements together to obtain the total linear footage.
- Account for corners and any additional length needed for mitered cuts. Add approximately 10% to your total linear footage to accommodate cutting errors and waste.
- Record your measurements and purchase the appropriate amount of crown molding based on your calculations.
Marking Cabinet Edges
To ensure proper placement and alignment of the crown molding, it’s helpful to mark the edges of your cabinets:
- Using a pencil, lightly draw a line on the face of the cabinets at the point where the bottom of the crown molding will be installed. This line will serve as a guide during installation.
- If your molding has a built-in lip, measure the distance from the top of the lip to the bottom of the molding and mark this distance on the cabinet edges.
Preparing the Cabinet Surface
To create a strong bond between the crown molding and cabinets, prepare the cabinet surface by following these steps:
- Clean the top edge of the cabinets with a mild soap and water solution to remove any grease, dust, or debris. Dry the surface thoroughly.
- Lightly sand the top edge of the cabinets using fine-grit sandpaper. This step will create a rough surface for better adhesion of the glue or adhesive.
- Wipe away any sanding dust with a damp cloth and allow the surface to dry completely.
By accurately measuring and preparing your cabinets, you’ll be well-equipped to install crown molding on your cabinets with precision and professionalism. Following these guidelines will ensure a seamless and attractive result, enhancing the overall appearance of your kitchen moldings.
Cutting the Crown Molding
Cutting the crown molding accurately is essential for a professional and seamless installation. In this section, we’ll provide a detailed guide on how to cut your kitchen crown molding, ensuring a precise fit on your cabinets.
Setting Up the Miter Saw
A miter saw is the ideal tool for cutting crown molding, as it allows you to make precise angled cuts. To set up your miter saw for cutting crown molding:
- Choose a sharp, fine-toothed blade designed for cutting trim or molding. This will ensure clean, smooth cuts.
- Set the miter angle on your saw to 45 degrees for cutting inside or outside corners. Consult the manufacturer’s instructions for your specific saw model if needed.
- Adjust the bevel angle, if necessary, based on the type of crown molding you’re using and the angle of the wall or cabinet corner.
Cutting Crown Molding
Follow these steps to cut your crown molding accurately:
- Place the crown molding against the fence of the miter saw, positioning it in the same orientation as it will be installed on the cabinets. This is known as the “upside-down and backward” method, which helps ensure accurate cuts.
- Hold the molding securely in place while making the cut. Be cautious not to apply too much pressure, as this can cause the molding to flex or move during cutting, resulting in an uneven cut.
- Make your first cut, then measure and mark the length needed for each section of your cabinets. Remember to account for the additional length required for mitered corners.
- Adjust the miter angle for inside or outside corners as needed, and make the second cut. Double-check your measurements before cutting to minimize errors and waste.
- Repeat the process for all sections of crown molding needed for your cabinet installation.
Test Fitting and Adjustments
Before moving on to installation, test fit your cut crown molding pieces against your cabinets:
- Hold each piece of molding in place to ensure it aligns correctly with the cabinet edges and corners.
- Check the fit of the mitered corners, ensuring they create a tight and seamless joint.
- Make any necessary adjustments by trimming or sanding the mitered cuts as needed to achieve a snug fit.
By following these detailed steps for cutting your crown molding, you’ll ensure precise and professional results when installing the molding on your cabinets. Accurate cuts and well-fitted corners will enhance the overall appearance of your kitchen moldings, creating a seamless and polished look.
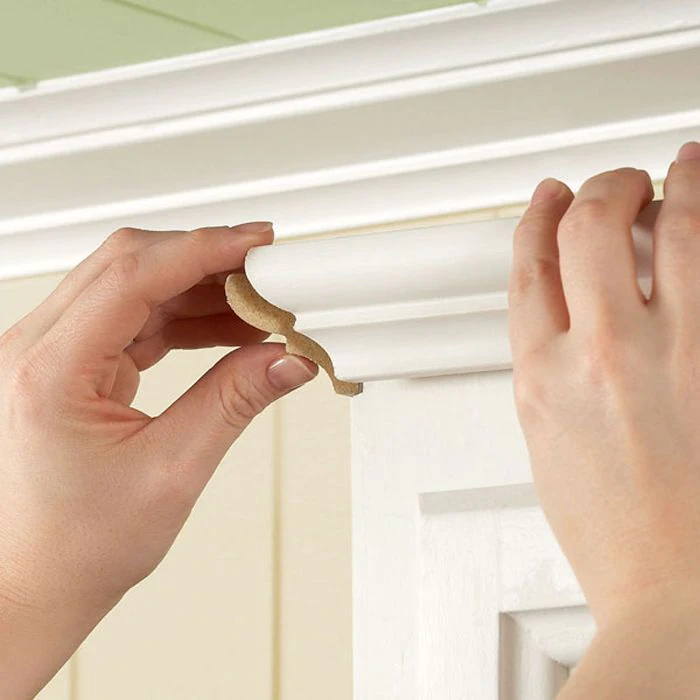
Dry Fitting and Adjusting
Dry fitting and adjusting your crown molding before installation is essential for achieving a professional and seamless appearance. This step allows you to ensure the molding pieces fit together and align properly with your cabinets. In this section, we’ll provide a detailed guide on how to dry fit and adjust your kitchen crown molding for a perfect installation.
Dry Fitting Crown Molding
Follow these steps to dry fit your crown molding:
- Begin at one end of your cabinets and hold the first piece of crown molding in place, making sure it aligns with the pencil marks you made earlier on the cabinet edges.
- Check that the molding sits flush against the cabinet surface and the mitered corner aligns correctly with the adjacent cabinet section.
- Continue to hold the molding in place while you position the next piece, ensuring the mitered corners fit snugly together.
- Repeat this process for all sections of crown molding, checking the fit and alignment at each corner and along the length of the cabinets.
Adjusting Crown Molding
If you encounter any issues during the dry fit, make the necessary adjustments:
- If the mitered corners do not fit together tightly, use a fine-grit sandpaper to gently sand the mitered cuts until they form a snug joint. Be cautious not to remove too much material, as this can create gaps between the molding and the cabinets.
- If the molding does not sit flush against the cabinets, check for any obstructions or uneven surfaces on the cabinet edges. Lightly sand the cabinet edges, if necessary, to create a smooth and even surface for the molding to adhere to.
- If the length of a molding piece is too long, measure and mark the correct length, and trim the molding using your miter saw. Be sure to maintain the appropriate miter angle when making adjustments.
Final Dry Fit
Once you have made the necessary adjustments, perform a final dry fit of your crown molding:
- Position all the molding pieces in place along the cabinet edges, ensuring a snug fit at each corner and a flush alignment with the cabinets.
- Inspect the overall appearance of the crown molding, making any additional adjustments as needed.
By carefully dry fitting and adjusting your crown molding, you’ll ensure a perfect installation that enhances the appearance of your kitchen moldings. This attention to detail will result in a professional and seamless look, highlighting the beauty of your cabinet crown molding.
Attaching the Cabinet Crown Molding
Once you’ve measured, cut, and dry-fitted your crown molding, the next step is to attach it to your cabinets. In this section, we’ll provide a detailed guide on how to securely attach your kitchen crown molding, ensuring a professional and long-lasting installation.
Applying Adhesive or Glue
Before attaching the crown molding to your cabinets, apply an adhesive or glue to create a strong bond:
- Select a high-quality wood glue or construction adhesive designed for trim and molding installation. Be sure to choose a product that is suitable for the material of your crown molding.
- Apply a thin, even bead of adhesive along the top edge of the cabinets where the molding will be installed. Ensure you cover the entire length of the cabinet edge to create a secure bond.
- For mitered corners, apply a small amount of adhesive to the mitered edges to ensure a tight and seamless joint.
Attaching the Crown Molding
Follow these steps to attach the crown molding to your cabinets:
- Starting at one end of your cabinets, press the first piece of crown molding firmly into place against the adhesive, ensuring it aligns with the pencil marks you made earlier on the cabinet edges.
- Hold the molding in place for a few seconds to allow the adhesive to begin bonding.
- Use a brad nailer or finish nails to secure the molding to the cabinets. Space the nails approximately 12-16 inches apart and drive them through the molding and into the cabinet edge.
- When nailing near mitered corners, be cautious not to split the molding. Place the nails approximately 1-2 inches away from the mitered edge to prevent damage.
- Continue attaching each piece of crown molding, ensuring a tight fit at each corner and proper alignment with the cabinets.
- If your molding has a built-in lip, use a few finish nails to secure the lip to the top of the cabinets for added stability.
Finishing Touches
After attaching your cabinet crown molding, complete the installation with these finishing touches:
- Fill any nail holes or gaps with wood filler or caulk, matching the color of your molding as closely as possible.
- Lightly sand the filled areas, if necessary, to create a smooth and even surface.
- Touch up the paint or stain on your crown molding to conceal any filled areas or blemishes.
By following this detailed guide on attaching your kitchen crown molding, you’ll achieve a secure and professional installation. This careful attention to detail will result in a beautiful and long-lasting addition to your kitchen moldings, enhancing the overall appearance of your cabinets.

Choosing the Right Tools and Materials
Selecting the appropriate tools and materials for your crown molding installation is essential for achieving a professional and successful result. In this section, we’ll provide a detailed guide on how to choose the right tools and materials to install crown molding on cabinets, ensuring a smooth and efficient process.
Essential Tools for Crown Molding Installation
The following tools are crucial for installing crown molding on your cabinets:
- Measuring Tape: A reliable measuring tape is necessary for taking accurate measurements of your cabinets and crown molding pieces.
- Pencil: Use a pencil to mark measurements, cabinet edges, and cutting lines on your molding.
- Miter Saw: A miter saw is the ideal tool for making precise angled cuts on your crown molding. Ensure the saw is equipped with a sharp, fine-toothed blade designed for cutting trim or molding.
- Sandpaper: Fine-grit sandpaper is useful for smoothing mitered cuts, adjusting the fit of molding pieces, and preparing the cabinet edges for adhesion.
- Level: A level will help ensure your crown molding is aligned properly during installation.
- Brad Nailer or Hammer and Finish Nails: A brad nailer or a hammer and finish nails are necessary for securing the crown molding to your cabinets.
- Wood Glue or Construction Adhesive: A high-quality adhesive is essential for creating a strong bond between the molding and your cabinets.
Additional Materials and Tools
Consider the following materials and tools to further enhance your crown molding installation:
- Painter’s Tape: Use painter’s tape to protect your cabinets and walls from any adhesive residue or accidental damage during installation.
- Wood Filler or Caulk: Fill any nail holes, gaps, or seams with wood filler or caulk that matches the color of your molding.
- Touch-up Paint or Stain: Keep some touch-up paint or stain on hand to conceal any filled areas, blemishes, or scratches on your crown molding.
- Safety Gear: Protect yourself during the installation process by wearing safety glasses and ear protection, especially when using power tools.
By choosing the right tools and materials for your crown molding installation, you’ll ensure a smooth, efficient, and professional process. Proper preparation and attention to detail will result in a beautiful addition to your kitchen moldings, enhancing the overall appearance of your cabinet crown molding.
Safety Precautions
When installing crown molding on cabinets, it is essential to prioritize safety to prevent accidents or injuries. In this section, we’ll provide a detailed guide on the safety precautions you should take during the installation process, ensuring a secure and professional outcome.
Power Tool Safety
When using power tools such as a miter saw during the installation process, keep the following safety tips in mind:
- Always read and follow the manufacturer’s instructions for your specific power tool model.
- Wear appropriate safety gear, including safety glasses and ear protection.
- Keep your hands and fingers clear of the cutting blade when operating the miter saw.
- Ensure the miter saw is securely positioned on a stable, level surface.
- Unplug the miter saw when not in use or when making adjustments to the blade or saw settings.
Ladder Safety
If you need to use a ladder to access the top of your cabinets, follow these safety guidelines:
- Choose a sturdy, stable ladder with a weight capacity suitable for your needs.
- Place the ladder on a level, non-slippery surface and ensure it is fully opened and locked in position.
- Keep both feet on the ladder at all times and maintain a 3-point contact (two hands and one foot, or two feet and one hand) while climbing or working.
- Do not overreach or lean too far to one side while on the ladder. Instead, reposition the ladder as needed to maintain a safe working posture.
General Safety Tips
Consider these general safety tips for a secure crown molding installation:
- Keep your workspace clean and organized, free from any tripping hazards or clutter.
- Wear appropriate clothing, avoiding loose or baggy garments that may get caught on tools or objects.
- Be cautious when handling sharp objects, such as the miter saw blade or utility knives.
- If using a brad nailer, ensure it is properly maintained and follow the manufacturer’s guidelines for safe use.
- Store tools and materials out of the reach of children and pets when not in use.
By following these safety precautions, you’ll reduce the risk of accidents or injuries during your crown molding installation. Prioritizing safety will ensure a successful and professional outcome, enhancing the overall appearance of your kitchen moldings and cabinet crown molding.
Customizing Your Kitchen Moldings
Customizing your kitchen moldings allows you to add a personal touch and unique style to your cabinets. In this section, we’ll provide a detailed guide on how to create a customized look for your kitchen crown molding, ensuring a distinctive and professional appearance.
Choosing the Right Style
When selecting crown molding for your kitchen cabinets, consider the following factors:
- Match the molding style to the overall design of your kitchen. Choose molding that complements your existing cabinetry, countertops, and hardware.
- Consider the size and scale of your kitchen. Larger moldings can make a bold statement in spacious kitchens, while smaller moldings may be more appropriate for compact spaces.
- Keep in mind the height of your cabinets and ceilings. Higher ceilings may accommodate taller and more intricate moldings, while lower ceilings may require simpler and more streamlined designs.
Combining Moldings for a Custom Look
To create a unique and personalized look for your kitchen moldings, consider combining different types of molding:
- Layer multiple moldings with different profiles, such as a large crown molding paired with a smaller trim piece, to add depth and dimension to your cabinets.
- Use different materials, finishes, or colors to create contrast and visual interest. For example, mix wood moldings with painted or stained finishes for a dynamic look.
- Incorporate decorative elements, such as corbels, rosettes, or medallions, to add a touch of elegance and sophistication to your cabinet crown molding.
Custom Finishing Techniques
Experiment with various finishing techniques to achieve a customized look for your kitchen crown molding:
- Apply a paint or stain that matches or complements the color of your cabinets for a cohesive appearance.
- Try antiquing, distressing, or glazing techniques to create a vintage or rustic look that highlights the molding’s details and texture.
- Use a high-gloss or metallic paint for a modern and striking finish that draws attention to your molding.
Lighting and Accessories
Incorporate lighting and accessories to enhance the appearance of your kitchen moldings:
- Install LED strip lighting or rope lights above the crown molding to create a warm and inviting ambiance in your kitchen.
- Use decorative brackets or hardware to accentuate the molding and complement the overall design of your kitchen.
By customizing your kitchen moldings, you can create a distinctive and stylish look that reflects your personality and design preferences. A well-designed and personalized crown molding installation can elevate the overall appearance of your kitchen, making your cabinet crown molding a standout feature in your home.
Conclusion
Installing crown molding on cabinets can significantly enhance the appearance of your kitchen and add a touch of elegance to your space. By following the detailed steps and guidelines provided in this blog, you can achieve a professional and successful installation. From selecting the right kitchen crown molding and preparing your cabinets, to cutting, dry fitting, and attaching the molding, attention to detail is key to ensuring a seamless and polished result.
Don’t forget to prioritize safety during the installation process and choose the appropriate tools and materials to make your project run smoothly. Customizing your kitchen moldings allows you to create a unique and personalized look that reflects your style and enhances the overall design of your kitchen.
With careful planning, preparation, and execution, you can transform your kitchen cabinets with beautiful and long-lasting crown molding that adds value and sophistication to your home.
FAQs about How to Install Crown Molding on Cabinets
Q: What is crown molding?
A: Crown molding is a decorative trim that is typically installed along the top edge of walls, cabinets, or other architectural elements to create a visually appealing transition between these surfaces. It is often used in kitchens to enhance the appearance of cabinetry and add a touch of elegance.
Q: What materials are commonly used for crown molding?
A: Crown molding can be made from a variety of materials, including wood, MDF (medium-density fiberboard), PVC, and polyurethane. Each material has its own advantages and drawbacks in terms of cost, durability, and ease of installation.
Q: How do I measure and cut crown molding accurately?
A: To measure crown molding, use a tape measure to determine the length of each piece needed for your cabinets. Mark the measurements on the molding using a pencil. To cut crown molding, use a miter saw with a sharp, fine-toothed blade designed for cutting trim. Set the saw to the appropriate angle for each cut, and ensure the molding is securely positioned before making the cut.
Q: How do I attach crown molding to my cabinets?
A: To attach crown molding to your cabinets, first apply a high-quality wood glue or construction adhesive along the top edge of the cabinets where the molding will be installed. Press the molding firmly into place, aligning it with the pencil marks made on the cabinet edges. Use a brad nailer or finish nails to secure the molding to the cabinets, spacing the nails approximately 12-16 inches apart.
Q: How can I customize my kitchen moldings?
A: To customize your kitchen moldings, consider choosing a style that complements your existing kitchen design, layering multiple moldings for added depth and dimension, experimenting with different finishing techniques, and incorporating lighting or decorative elements to enhance the overall appearance.
Q: What safety precautions should I take when installing crown molding on cabinets?
A: Prioritize safety by following power tool guidelines, wearing appropriate safety gear, keeping your workspace clean and organized, and using ladders safely. Always read and follow the manufacturer’s instructions for any tools or materials you use during the installation process.
Q: Can I install crown molding on cabinets with uneven ceilings?
A: Yes, you can install crown molding on cabinets with uneven ceilings. However, you may need to make adjustments to the molding or use shims to ensure a consistent and level appearance. Use a level to check for alignment during installation and make any necessary adjustments to achieve a professional result.
Q: How do I maintain and clean crown molding on cabinets?
A: To maintain and clean your crown molding, use a soft, dry cloth or a duster to remove dust and debris. For more thorough cleaning, use a mild soap and water solution with a soft cloth or sponge, making sure to avoid soaking the molding. Always dry the molding thoroughly after cleaning to prevent moisture damage.
Q: How do I repair damaged crown molding on cabinets?
A: To repair damaged crown molding on cabinets, use wood filler or caulk to fill in any cracks, gaps, or nail holes. Sand the repaired area with fine-grit sandpaper until it is smooth and flush with the surrounding molding. Touch up the repaired area with matching paint or stain to conceal the repair and maintain a consistent appearance.
Q: How much does it cost to install crown molding on cabinets?
A: The cost of installing crown molding on cabinets can vary depending on factors such as the type of molding material, the complexity of the installation, and whether you choose to do the project yourself or hire a professional. Material costs can range from $1 to $15 or more per linear foot, while labor costs (if hiring a professional) can range from $2 to $8 per linear foot.
Q: Can I paint or stain my crown molding after installation?
A: Yes, you can paint or stain your crown molding after installation. To do so, lightly sand the surface of the molding to prepare it for paint or stain application. Apply a coat of primer (if painting) or pre-stain conditioner (if staining), followed by the desired paint or stain color. Finish with a clear topcoat for added durability and protection.
Q: Do I need to remove my cabinets to install crown molding?
A: No, you don’t need to remove your cabinets to install crown molding. Crown molding can be installed directly onto the top edge of your existing cabinets, making it a relatively straightforward and non-invasive project that can be accomplished without removing or altering the cabinets themselves.