
How to Paint Cabinets Without Sanding
Painting cabinets without sanding is an increasingly popular method for homeowners who want to give their kitchen or bathroom a fresh new look without the hassle and mess of sanding. In this comprehensive guide, we will explore how to paint cabinets without sanding, including tips for achieving a professional finish, the best paint for cabinets without sanding, and more.
Section 1: The Benefits of Painting Cabinets Without Sanding
Painting cabinets without sanding has become an increasingly popular method among homeowners and professionals alike. This approach offers numerous benefits that make it an attractive option for those looking to refresh the look of their kitchen or bathroom cabinets. Here, we will delve deeper into the advantages of this technique.
- Time-saving: One of the most significant benefits of painting cabinets without sanding is the amount of time saved. Sanding can be a time-consuming process, especially when dealing with intricate details, grooves, and multiple cabinet surfaces. By skipping the sanding step, you can complete your project more quickly and move on to other home improvement tasks.
- Less labor-intensive: Sanding cabinets can be physically demanding, requiring considerable effort and repetitive motion. By opting for a no-sanding method, you can save energy and reduce the risk of strain or injury.
- Reduced dust and mess: Sanding generates a significant amount of dust, which can spread throughout your home and create a mess. This dust can also pose respiratory hazards for those with allergies or sensitivities. Painting cabinets without sanding eliminates dust production, making the process cleaner and safer for everyone involved.
- Lower costs: Sanding cabinets requires purchasing or renting sanding equipment and materials, such as sandpaper or sanding pads. By choosing to paint without sanding, you can save money on these expenses and allocate your budget towards higher-quality paint and other essential materials.
- Environmentally friendly: Sanding can release harmful particles and volatile organic compounds (VOCs) into the air, which can negatively impact indoor air quality and contribute to environmental pollution. Painting cabinets without sanding is a more eco-friendly option, as it minimizes the release of harmful substances.
- Preservation of original details: If your cabinets have intricate designs or carving, sanding can inadvertently remove or damage these unique features. By forgoing the sanding process, you can maintain the original character of your cabinets while still achieving a fresh, updated look.
- Versatility: Painting cabinets without sanding can be done on various surfaces, such as wood, laminate, or veneer, making it a versatile option for homeowners with different cabinet materials.
- Accessible for DIYers: The no-sanding method is a more accessible option for DIY enthusiasts with limited experience in home improvement projects. By following detailed instructions and using the right materials, even beginners can achieve professional-looking results without the need for specialized skills or equipment.
What You’ll Need to Paint Cabinets Without Sanding
Below is a list of equipment, tools, and materials you’ll need for painting cabinets without sanding, presented in a chart format.
| Equipment / Tools | Materials |
|---|---|
| 1. Electric drill | 1. Tri-Sodium Phosphate (TSP) or TSP substitute |
| 2. Manual screwdriver (Phillips) | 2. Liquid sander/deglosser |
| 3. Manual screwdriver (flathead) | 3. Bonding primer |
| 4. Painter’s pyramids or tripods | 4. Enamel cabinet paint |
| 5. Latex or nitrile gloves | 5. Plastic sheeting |
| 6. High-quality nylon brush | 6. Painter’s tape |
| 7. Foam roller handle | 7. Tack cloth |
| 8. Paint tray | 8. Sandpaper (220-grit) |
| 9. Clean bucket | 9. Paint tray liners |
| 10. Sponge | 10. Foam rollers (4-inch and 2-inch) |
| 11. Microfiber cloths | |
| 12. Masking film | |
| 13. Drop cloths (optional) |
Section 2: Preparing the Cabinets for Painting Without Sanding
To achieve a professional finish when painting cabinets without sanding, it’s essential to properly clean, degloss, and prime the surfaces before applying the paint. Here are the steps to prepare your cabinets for painting:
- Assess the painting plan: Determine which surfaces of the cabinets will be painted, including both sides of the cabinet doors, drawer fronts, and outer surfaces of the cabinet boxes. Decide whether you will paint the insides of cabinet boxes or drawers, shelves, or cabinet tops and bottoms.
- Create a work area for painting: Set up a large, sheltered space, such as a garage or covered patio, and cover the ground with plastic sheeting to protect it from paint.
- Remove hardware: Take off cabinet door and drawer pulls, as well as other hardware, except for hinges. Label and store them in individual plastic bags to ensure proper reinstallation.
- Remove cabinet doors and drawer fronts: Carefully remove the doors and drawer fronts and label them for easier reassembly later.
- Clean the surfaces with tri-sodium phosphate (TSP) or TSP substitute: Thoroughly clean all cabinet surfaces that will be painted to remove grease, dirt, and grime. Pay special attention to areas around cabinet pulls and other frequently touched spots.
- Degloss the surfaces: Apply a liquid sander/deglosser to the cabinet surfaces to prepare them for primer and paint. This step is crucial for ensuring proper adhesion of the primer and paint.
- Apply a bonding primer: Use a high-quality bonding primer designed for cabinets to create a strong bond between the cabinet surface and the paint.
Section 3: Choosing the Best Paint for Cabinets Without Sanding
Selecting the right paint is crucial for achieving professional and lasting results when painting cabinets without sanding. In this section, we will provide more details on how to choose the best paint for your cabinets, taking into consideration factors such as paint type, finish, durability, and color.
- Paint Type: There are various types of paint available on the market, but some are better suited for cabinets than others. When painting cabinets without sanding, it’s essential to choose a paint with excellent adhesion and durability. Oil-based, waterborne alkyd, and high-quality acrylic latex paints are all suitable choices. These paints have excellent bonding properties and create a durable, long-lasting finish.
- Finish: Cabinets are frequently exposed to moisture, grease, and dirt, so it’s important to choose a paint finish that is easy to clean and maintain. Satin, semi-gloss, and gloss finishes are ideal for cabinets, as they offer a smooth surface that is resistant to stains and easier to wipe clean. Matte or flat finishes are not recommended, as they tend to show dirt and are more challenging to maintain.
- Durability: Your cabinets endure daily use and need a paint that can withstand wear and tear. Look for paints specifically designed for cabinetry or trim, as they often have added resins or additives that improve durability and resistance to chipping, peeling, and fading.
- Color: The color you choose for your cabinets will significantly impact the overall look of your kitchen or bathroom. Consider the existing color scheme and style of the space when selecting a paint color. Popular choices for cabinets include white, gray, and neutral tones, as they create a timeless and versatile look. However, don’t be afraid to experiment with bolder colors if it suits your personal taste and the overall design of your space.
- Primer Compatibility: When painting cabinets without sanding, using a high-quality bonding primer is essential for proper adhesion. Ensure that the paint you choose is compatible with the bonding primer you plan to use. If you’re unsure, consult the paint manufacturer’s recommendations or ask for advice from a knowledgeable paint store employee.
- VOC Content: Paints with low or zero volatile organic compound (VOC) content are more environmentally friendly and contribute to better indoor air quality. When choosing a paint for your cabinets, opt for a low-VOC or zero-VOC option if possible. These paints will have less odor during application and minimize potential health risks associated with VOCs.
- Brand Reputation: Consider the reputation of the paint brand when making your selection. Well-established brands with a history of producing high-quality paints are more likely to offer reliable, long-lasting products. Seek recommendations from friends, family, or online reviews to help determine which brands have the best track record for cabinet paint.
Section 4: Painting Cabinets Without Sanding
In this section, we will delve deeper into the process of painting cabinets without sanding, providing more detailed information on each step and offering tips for achieving professional results.
- Preparing the Area:
- Protect your floors, countertops, and appliances with drop cloths or plastic sheeting, ensuring they are secure with painter’s tape.
- Ventilate the area by opening windows and doors, and set up a fan to improve air circulation.
- Gather all materials, including paint, primer, brushes, rollers, and cleaning supplies, so they are readily available throughout the project.
- Removing Cabinet Hardware:
- Use a screwdriver to carefully remove all knobs, handles, and hinges from the cabinet doors and drawers.
- Label each piece of hardware with its corresponding location to ensure proper reassembly later.
- Clean hardware with a degreasing cleaner, and set aside for reinstallation after painting.
- Cleaning and Degreasing Cabinets:
- Thoroughly clean all cabinet surfaces with a TSP solution or a TSP substitute to remove dirt, grease, and grime.
- Pay special attention to areas around handles and edges, where dirt and grease tend to accumulate.
- Rinse surfaces with clean water, and allow them to dry completely before moving on to the next step.
- Applying Liquid Sander/Deglosser:
- Put on protective gloves and safety glasses before handling the deglosser.
- Apply the liquid sander/deglosser to a microfiber cloth or sponge, and rub it onto the cabinet surfaces in a circular motion.
- Allow the deglosser to dry according to the manufacturer’s instructions before proceeding.
- Priming the Cabinets:
- Choose a high-quality bonding primer that is compatible with your chosen paint.
- Apply the primer using a brush for detailed areas and a foam roller for larger, flat surfaces.
- Allow the primer to dry according to the manufacturer’s recommendations, and apply a second coat if necessary for optimal coverage.
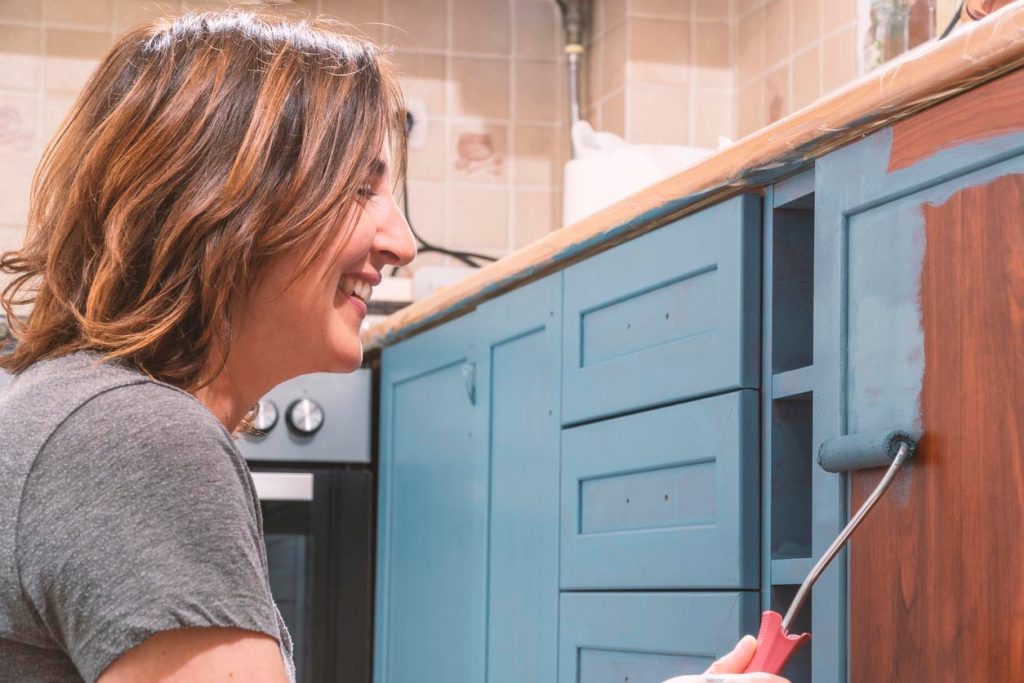
- Painting the Cabinets:
- Stir the paint thoroughly before applying it to the cabinets.
- Use a high-quality brush or foam roller for even paint application, ensuring smooth coverage.
- Start with detailed areas, such as beveled edges or raised panels, and then move on to the larger surfaces.
- Allow the first coat of paint to dry, and then apply a second coat for a more durable and even finish.
- Inspecting and Touching Up:
- Once the paint is dry, inspect the cabinets for any imperfections or uneven coverage.
- Touch up any areas that require additional paint, using a small brush for precision.
- If needed, lightly sand any rough spots with fine-grit sandpaper and then apply another coat of paint.
- Reassembling and Installing Hardware:
- After the paint is completely dry, reattach the hardware to the cabinet doors and drawers, ensuring that each piece is returned to its original location.
- Reinstall the cabinet doors and drawers, and adjust hinges as needed for proper alignment.
Section 5: Maintaining Your Newly Painted Cabinets
To keep your painted cabinets looking their best, follow these tips for proper care and maintenance:
- Clean the cabinets regularly: Wipe down the cabinet surfaces with a soft, damp cloth to remove dust, grease, and dirt. Avoid using harsh chemicals or abrasive cleaners, which can damage the paint.
- Address any damage promptly: If you notice any chips, scratches, or other damage to the paint, touch up the affected areas as needed to maintain the integrity of the finish.
- Use protective measures: Install felt pads or other protective materials on the insides of cabinet doors and drawers to prevent damage from pots, pans, and other items.
Conclusion
In conclusion, painting cabinets without sanding can result in a professional, long-lasting finish if you follow the proper preparation and painting techniques. By choosing the right paint, taking the time to thoroughly clean and degloss the surfaces, and applying a high-quality bonding primer, you can achieve a beautiful, durable finish on your cabinets without the need for sanding. With proper care and maintenance, your newly painted cabinets will look stunning for years to come.
FAQs about How to Paint Cabinets Without Sanding
- Can you paint cabinets without sanding?
Yes, you can paint cabinets without sanding. As long as the surface is stable and in good condition, proper cleaning, deglossing, and using a high-quality cabinet paint can result in a successful painting project without sanding.
- What happens if you don’t sand cabinets before painting?
If you don’t sand cabinets before painting, the paint may not adhere properly, leading to peeling or chipping over time. However, with proper cleaning, deglossing, and the use of a bonding primer, you can achieve a long-lasting and durable finish without sanding.
- Do you really need to remove the doors and drawer fronts?
Removing the cabinet doors and drawer fronts ensures a smoother finish because the pieces can be laid flat for painting, thus avoiding drips. You’re also able to access all sides of the doors and drawer fronts when they are removed. It is highly recommended to remove them for the best results.
- What is the best paint for cabinets without sanding?
The best paint for cabinets without sanding is enamel cabinet paint, which is specifically designed for cabinets, doors, or trim. Most cabinet paints are satin or semi-gloss, providing a durable finish that’s easy to clean.
- How many coats of paint should be applied to cabinets without sanding?
Apply a minimum of two coats of cabinet paint, waiting at least two hours between coats for the best results. Additional coats may be necessary depending on the paint’s coverage and desired finish.
- Do you need to use a primer before painting cabinets without sanding?
Yes, using a bonding primer is essential before painting cabinets without sanding. Bonding primers have resins that create an adhesive link between the cabinet and the paint, providing better adhesion and helping to prevent peeling, flaking, and chipping.
- How long should I wait between applying primer and paint?
Wait at least an hour before topcoating the primer with cabinet paint. Check for adhesion by sticking a strip of painter’s tape and pulling it up again. No primer should remain on the tape.
- Can I paint the insides of cabinet boxes or drawers without sanding?
Yes, you can paint the insides of cabinet boxes or drawers without sanding, following the same cleaning, deglossing, and priming steps as for the exterior surfaces. However, painting the insides of cabinets and drawers is optional and depends on your personal preference.
- How long does it take for the paint to fully cure on cabinets without sanding?
The curing time for cabinet paint varies depending on the brand, type of paint, and environmental conditions. Generally, it takes around 7 to 14 days for the paint to fully cure and harden. It’s essential to avoid heavy use and exposure to moisture during the curing period.
- How do I maintain the finish on painted cabinets without sanding?
To maintain the finish on painted cabinets without sanding, clean the surfaces regularly using a mild, non-abrasive cleaner and a soft cloth or sponge. Avoid using harsh chemicals or abrasive cleaning tools, as they can damage the paint finish.