How to Repaint Kitchen Cabinets
Welcome to our comprehensive guide on how to repaint kitchen cabinets! If you’re looking to give your kitchen a fresh, updated look without spending a fortune, repainting your cabinets is the way to go. In this detailed and professional blog, we will walk you through the entire process of repainting kitchen cabinets, ensuring you achieve the perfect makeover for your space. Let’s dive in!
Why Repaint Kitchen Cabinets?
One of the most significant advantages of repainting kitchen cabinets is the opportunity to revitalize your kitchen space without a complete overhaul. In this section, we’ll explore the various reasons why homeowners choose to repaint cabinets and how it can benefit your kitchen.
- Cost-Effective Makeover: Kitchen renovations can be expensive, but repainting cabinets offers an affordable alternative. By choosing to repaint kitchen cabinets, you can save thousands of dollars compared to the cost of replacing them entirely. This budget-friendly option allows you to refresh your kitchen’s appearance without breaking the bank.
- Customization: Repainting kitchen cabinets gives you the freedom to choose colors, finishes, and styles that reflect your personal taste. Whether you prefer a classic look, a modern touch, or a bold statement, repainting cabinets allows you to create a unique kitchen design that suits your preferences.
- Increased Home Value: A well-executed kitchen cabinet repaint can increase the value of your home. Prospective buyers often appreciate updated kitchens, and repainting cabinets can make your space look new and well-maintained. This simple update can make your home more attractive to potential buyers and boost its resale value.
- Environmentally Friendly: When you repaint kitchen cabinets instead of replacing them, you contribute to a more sustainable approach to home improvement. Repurposing your existing cabinets reduces waste and the need for new materials, ultimately benefiting the environment.
- Quick Transformation: Compared to a full kitchen remodel, repainting cabinets is a relatively quick project. Depending on the size of your kitchen, you can typically complete the process in a matter of days. This shorter timeframe minimizes disruption to your daily routine and allows you to enjoy your updated kitchen sooner.
In conclusion, repainting kitchen cabinets is a practical and cost-effective way to breathe new life into your kitchen. This popular home improvement project not only allows you to personalize your space but also adds value to your home and contributes to a more sustainable future.
Choosing the Right Paint for Repainting Kitchen Cabinets
Selecting the right paint for your kitchen cabinets is essential to ensure a durable and professional finish. In this section, we will discuss the various paint types available for repainting cabinets and offer guidance on how to choose the best option for your needs.
- Oil-Based Paint: Oil-based paint has long been a popular choice for repainting kitchen cabinets due to its durability and smooth finish. This type of paint is known for its ability to level out and minimize brush strokes, resulting in a professional appearance. However, oil-based paint can be more challenging to work with, as it takes longer to dry and has a stronger odor. It also requires the use of mineral spirits or paint thinner for cleanup.
- Water-Based Paint (Latex or Acrylic): Water-based paint, such as latex or acrylic, is another popular option for repainting cabinets. These paints dry faster, emit less odor, and clean up easily with soap and water. They also tend to be more environmentally friendly than oil-based paints. However, water-based paints may not be as durable or level out as smoothly as oil-based options.
- Alkyd Paint: Alkyd paint combines the best of both oil-based and water-based paints, offering durability and ease of use. Alkyd paints are waterborne and possess a similar leveling property as oil-based paints, which helps reduce brush strokes. They also have a faster drying time and easier cleanup process than traditional oil-based options.
- Cabinet-Specific Paint: Some paint manufacturers offer products specifically designed for repainting kitchen cabinets. These paints are formulated to adhere well to cabinetry and provide a durable, long-lasting finish. They may also have built-in primers or other additives that improve the painting process.
To choose the right paint for repainting your cabinets, consider the following factors:
a. Durability: Select a paint that can withstand the wear and tear of daily kitchen use. High-quality, durable paint will ensure that your cabinets look great for years to come.
b. Finish: The finish you choose will impact the final appearance of your cabinets. Options include matte, satin, semi-gloss, and high-gloss finishes. Glossier finishes are generally more durable and easier to clean, making them ideal for kitchen cabinets.
c. Color: Your choice of color can dramatically change the look of your kitchen. Consider the overall design of your kitchen, including the countertops, flooring, and appliances, when selecting a color for your cabinets.
d. Drying Time: Consider the drying time of the paint, as this will impact the overall time it takes to complete your cabinet repaint project.
In conclusion, choosing the right paint for repainting kitchen cabinets is crucial for a successful and long-lasting transformation. By considering factors such as durability, finish, color, and drying time, you can select the perfect paint for your kitchen cabinet makeover.
Preparing Your Kitchen Cabinets for Repainting
Thorough preparation is crucial to achieving a smooth, professional finish when repainting kitchen cabinets. In this section, we will outline the steps you need to take to properly prepare your cabinets for repainting, ensuring a flawless result.
- Empty and Clean Cabinets: Begin by removing all items from your cabinets and drawers. Then, use a mild detergent and water solution to clean the surfaces of your cabinets, removing any grease, grime, or residue. This step is essential, as a clean surface will allow the paint to adhere properly.
- Remove Hardware and Label Doors: Carefully remove all hardware, such as handles, knobs, and hinges, from your cabinet doors and drawers. Label each door and drawer with its corresponding location using painter’s tape and a pen. This will make it easier to reassemble your kitchen cabinets once the repainting process is complete.
- Protect Countertops, Appliances, and Flooring: Cover your countertops, appliances, and flooring with plastic sheeting or drop cloths to protect them from paint splatters and dust during the repainting process. Secure the coverings with painter’s tape to keep them in place.
- Sand the Cabinets: Sanding your cabinets is a critical step in the preparation process, as it promotes better paint adhesion and ensures a smooth final finish. Using a medium-grit sandpaper (around 120-grit), lightly sand all surfaces of your cabinet doors, drawer fronts, and frames. Be sure to sand in the direction of the wood grain. After sanding, wipe down the surfaces with a tack cloth or damp rag to remove any dust.
- Apply Primer: Applying a high-quality primer to your cabinets is essential for a long-lasting and professional-looking repaint. A primer creates a uniform base for the paint to adhere to and can help prevent any stains or discoloration from bleeding through the paint. Choose a primer that is compatible with the type of paint you have selected for your cabinets. Apply the primer with a brush or roller, following the manufacturer’s instructions and allowing for adequate drying time.
- Repair Any Imperfections: Before painting, inspect your cabinets for any nicks, scratches, or dents that need repair. Fill these imperfections with wood filler, and once dry, sand the area smooth. Wipe down the surface with a tack cloth or damp rag to remove any dust.
By following these essential preparation steps, you’ll create the perfect foundation for repainting your kitchen cabinets. Proper preparation is key to achieving a professional, long-lasting finish that will transform your kitchen space.
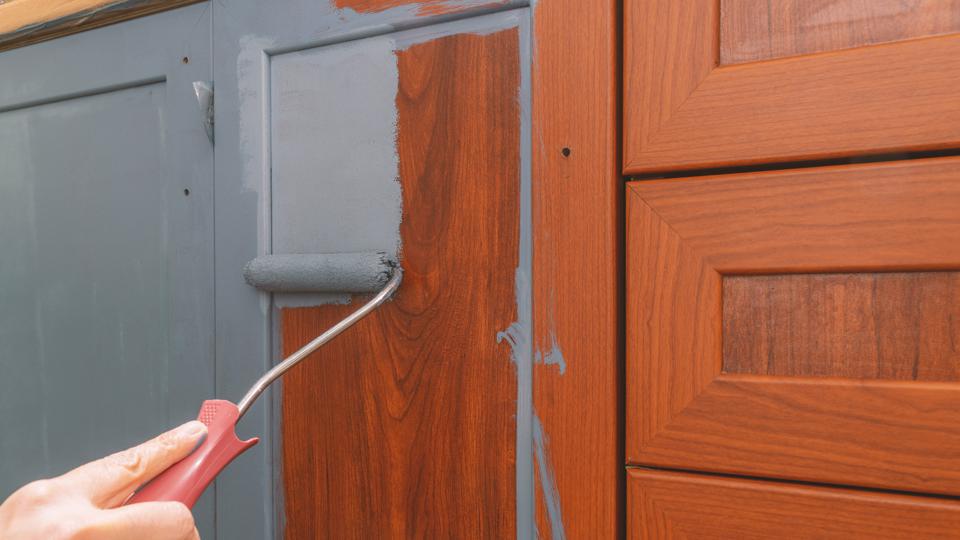
How to Repaint Kitchen Cabinets: The Painting Process
Once your cabinets are thoroughly prepared, it’s time to begin the painting process. In this section, we will provide a detailed, step-by-step guide on how to repaint kitchen cabinets, ensuring a smooth, professional finish.
- Set Up a Painting Station: Create a designated painting area where you can paint your cabinet doors and drawer fronts without interruption. This could be a garage, basement, or a well-ventilated room with ample space to lay out the doors and drawers. Place a drop cloth or plastic sheeting on the floor to protect it from paint spills and drips.
- Stir and Pour the Paint: Stir your chosen paint thoroughly to ensure even color and consistency. Pour a manageable amount of paint into a paint tray or a smaller container for easier access while painting.
- Paint the Cabinet Doors and Drawer Fronts: Start by painting the backside of the cabinet doors and drawer fronts. Use a high-quality brush or foam roller to apply the paint, working in thin, even coats. Begin by painting the edges and any raised or recessed panels, followed by the larger flat surfaces. Allow the paint to dry according to the manufacturer’s recommendations before flipping the doors and drawer fronts over to paint the front side.
- Paint the Cabinet Frames: While the doors and drawer fronts are drying, you can begin painting the cabinet frames. Use a brush to paint the edges, corners, and any detailed areas, followed by a roller for larger, flat surfaces. Apply thin, even coats, taking care to avoid drips and runs.
- Apply Additional Coats: Allow the paint to dry completely before assessing if additional coats are necessary. Most repainting projects will require at least two coats of paint for a professional, even finish. Be sure to allow adequate drying time between coats, as specified by the paint manufacturer.
- Inspect the Finish: After applying the final coat of paint and allowing it to dry, carefully inspect your cabinets for any missed spots, drips, or uneven areas. Touch up any imperfections as needed, and allow the paint to dry completely.
By following these detailed steps, you can successfully repaint your kitchen cabinets, achieving a smooth, professional finish. This process will breathe new life into your kitchen and give it a fresh, updated appearance.
Finishing Touches and Reassembly
Once your repainted kitchen cabinets are completely dry, it’s time to add the finishing touches and reassemble your kitchen. This section will guide you through the final steps, ensuring a polished and professional result.
- Apply a Protective Topcoat (Optional): Depending on the type of paint used and your desired level of durability, you may choose to apply a protective topcoat to your cabinets. This can help protect the paint from chipping, scratches, and wear over time. Select a clear, water-based polyurethane or polycrylic topcoat designed for cabinetry and follow the manufacturer’s instructions for application and drying times.
- Reattach Hardware: Carefully reattach the hardware to your cabinet doors and drawer fronts. If you’ve chosen to update your hardware, now is the time to install the new pieces. Be gentle when tightening screws to avoid damaging the freshly painted surfaces.
- Reinstall Doors and Drawers: Using the labels you created during the preparation stage, reinstall the cabinet doors and drawers in their corresponding locations. Adjust the hinges if necessary to ensure proper alignment and smooth operation.
- Remove Protective Coverings: Once everything is reassembled, carefully remove the plastic sheeting or drop cloths from your countertops, appliances, and flooring. Clean up any paint spills or debris as needed.
- Clean and Organize: Before returning items to your cabinets, take the opportunity to clean and organize your kitchenware. Discard or donate any items you no longer need or use, and arrange your belongings in a way that maximizes efficiency and accessibility.
- Maintain Your Repainted Cabinets: To keep your newly repainted kitchen cabinets looking their best, clean them regularly with a gentle cleanser and a soft cloth. Avoid using abrasive cleaners or scrubbing pads, as these can damage the paint finish. Address any chips or scratches promptly with touch-up paint to maintain the appearance and protect the underlying wood.
By following these steps, you’ll complete your kitchen cabinet repaint project with a professional and polished result. Your updated, revitalized kitchen is now ready for you to enjoy, adding value and beauty to your home for years to come.
Conclusion
Repainting kitchen cabinets is a fantastic way to give your kitchen a fresh, updated look without breaking the bank. By following our detailed and professional guide, you’ll have all the knowledge and tools you need to tackle this DIY project with confidence. So, roll up your sleeves and get ready to transform your kitchen with a stunning cabinet repaint!